Introduction
Baselines in IBM Engineering DOORS Next Generation (DNG) are always created for the whole component. Hence, baselines cannot be more granular than components.
It is therefore always an issue for the DNG users to revert back to a certain version of a single (or sometimes more than one) module, without reverting back the whole component to a previously saved baseline.
Due to this reason, some users of DNG prefer to define components as granular as possible so that every baseline created would be very specific. However, even that granularity is not an exact solution to the problem of reverting a single module back to its previous version, unless they define one component per module. Of course that is not a scalable and manageable solution.
In this article, we would like to address this very specific problem and would like to offer a solution that can help DNG users to be very flexible working with baselines of modules and retrieve any baselined version of a module to any configuration they’d like.
To explain the problem statement further, let’s introduce a case study.
Case Study - 1 : The Need to Revert one Module to a Previous Baseline
The System Engineering Team is working on a set of stakeholder requirements. They have created a component for those kinds of requirements and there are three documents imported from stakeholders.

1.)Stakeholder Requirements and Document types
Let’s assume the customer is specifying some hardware constraints, interface specifications and some performance requirements in three different documents.
The team has collected those requirements and is managing them in three different modules.
All these three modules or documents were evaluated and discussed with the customer and while such communication was happening, they got changed. Customer agreed with some change requests and updated their requirements accordingly etc.. And at the end, after all these progress, the component was baselined in such a way that each baseline holds a different version of these documents:
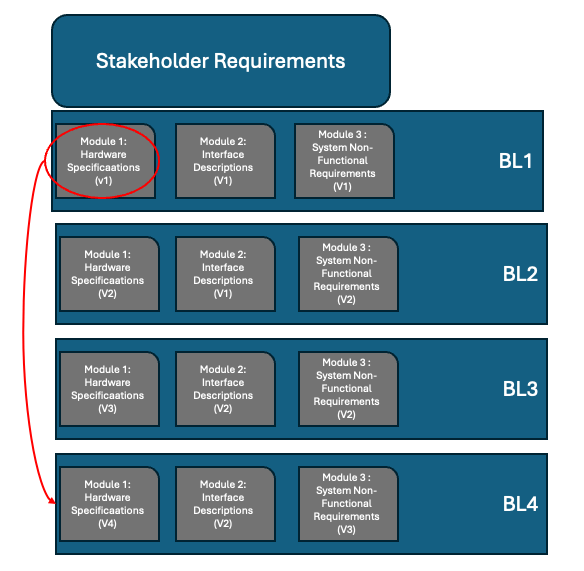
2.) Different versions of stakeholder requirements
The team is now working on the fifth revision of hardware specifications, third revision of the interface descriptions and fourth revision of the system non-functional requirements.
At that point the customer wanted to change the hardware and wants to revert back to the initial version of the hardware specifications. However, reverting the whole component back to baseline 1 (BL1) will not be any solution cause wilth the hardware specifications, all the other modules will be reverted.
In such cases we can use a very special feature of DNG, which is “Clone from Component”.
“Clone From Component” as a Solution to Partially Reverting the Contents of a Component
Let’s consider we are working in a DNG Project Area and the component mentioned in the case study is called: “ACC Demo (Stakeholder Requirements)”.
In this component, the list of the modules we have is as follows:

3.) Component with a list of modules
The existing configuration that the team is working on is,

4.) Example Configuration
This stream above, has already some baselines as follows:
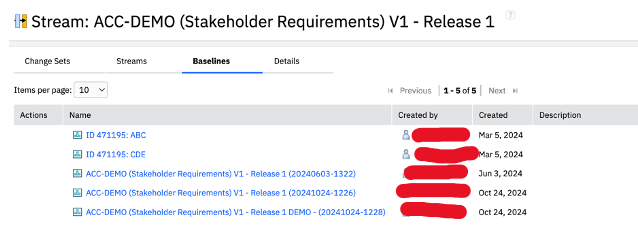
5.) Stakeholder Requirements Baseline example
As per the case study now lets assume the team has to continue their work with the latest version of all the modules but only one module is required to be reverted back to the version in June 3, ie, “ACC-DEMO (Stakeholder Requirements) V1 - Release 1 (20240603-1322)” baseline.
Procedure for Reverting a Single Module to Previous Baseline:
Step 1: Create an empty Component:
First we need to create an empty component. It is better if that component doesn't even have any properties imported from another component or from a template. It should not have any data nor metadata.
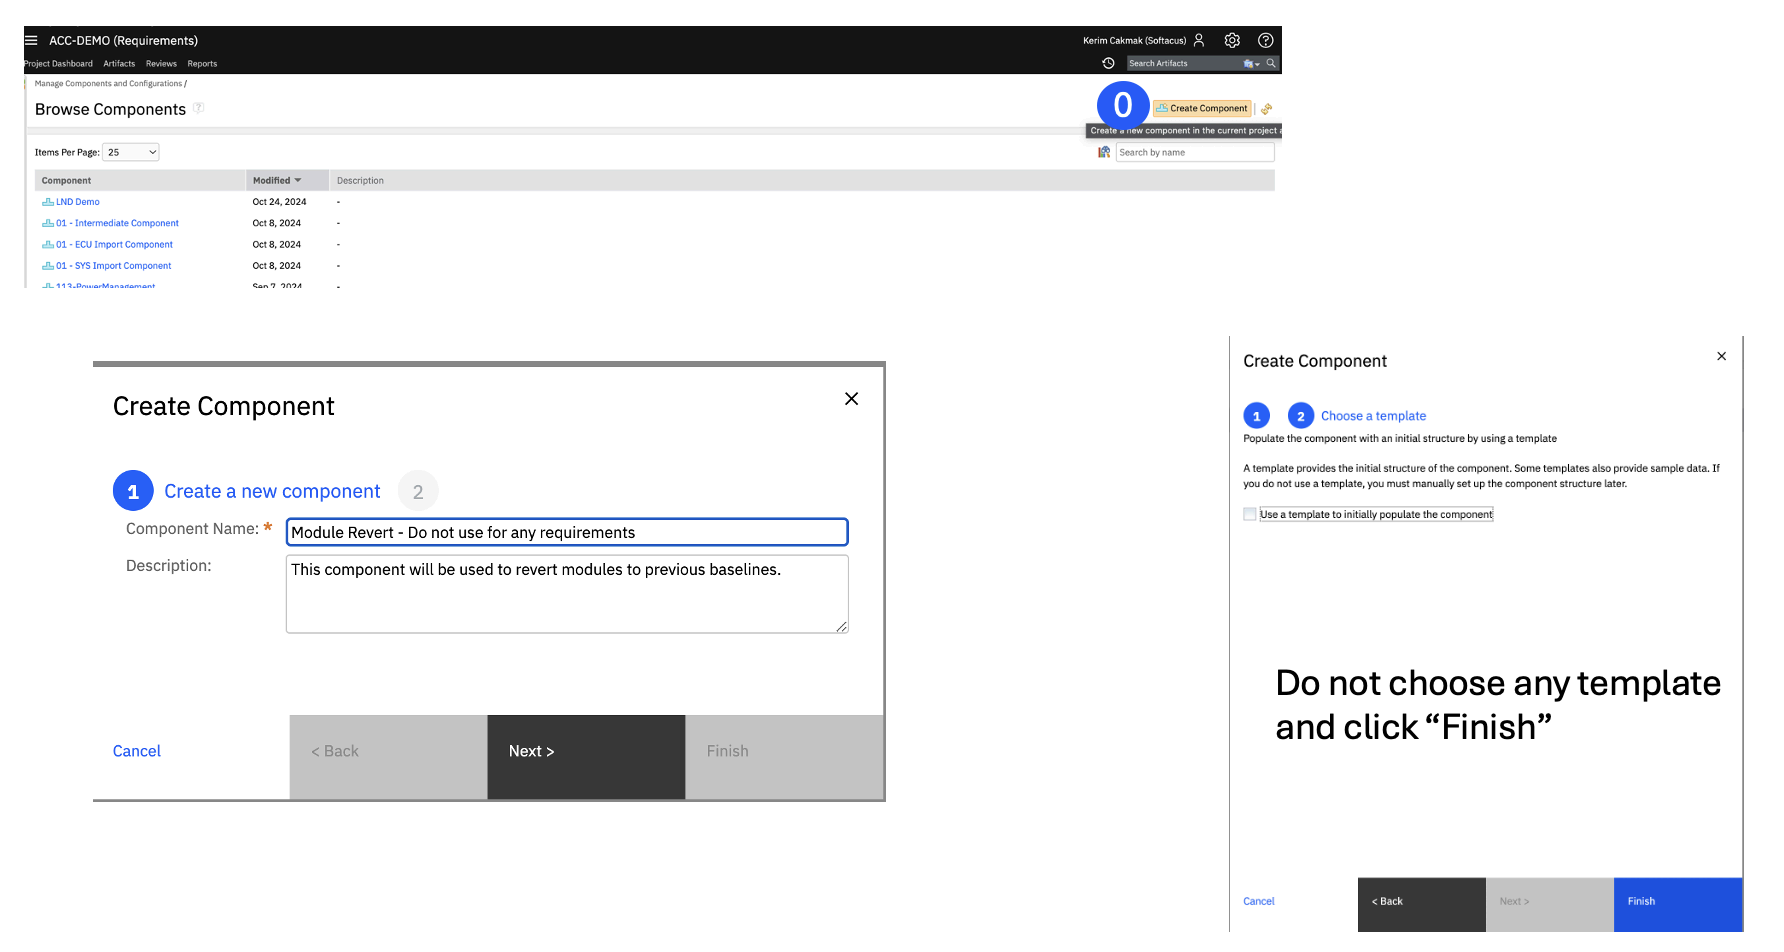
6.) How to create component
Step 2: Create a change set on the new component:
Now we have an empty component. We need to have a change set to load the desired version of the module to our empty component.
- Go to the default stream of the component:
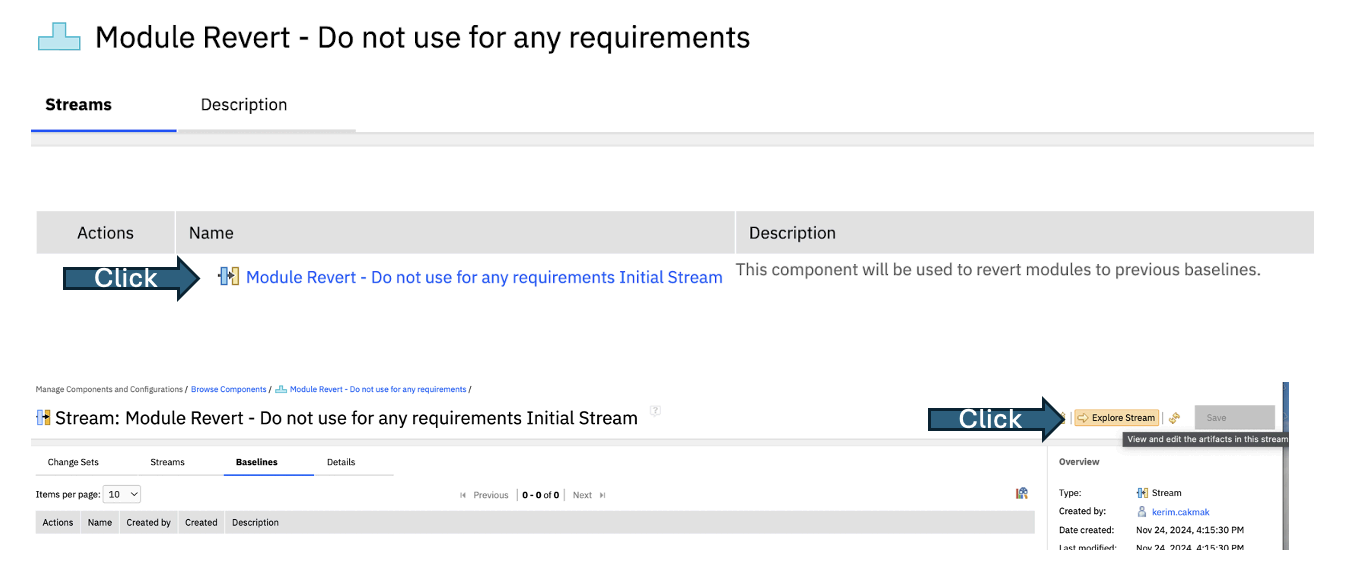
7.) Showcase of Module Revert Interface
2. Do not choose anything in the “Component Setup”.
Just click “Close”.
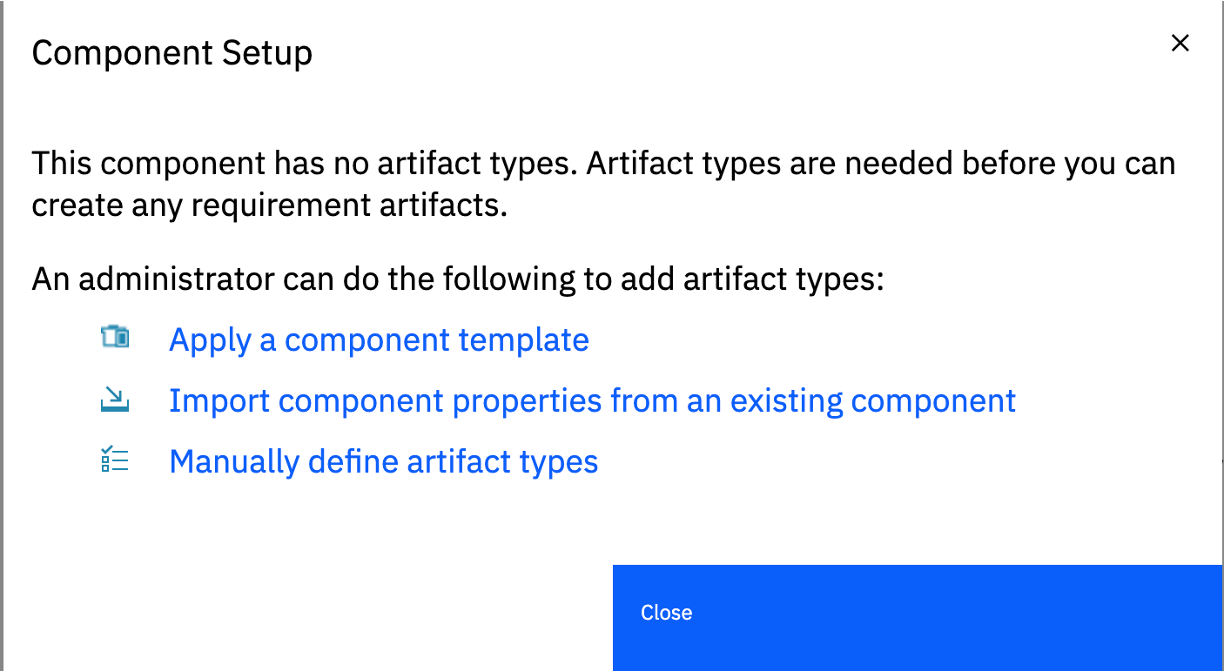
8.) Component setup window
3. From the configuration context, create a new change set:
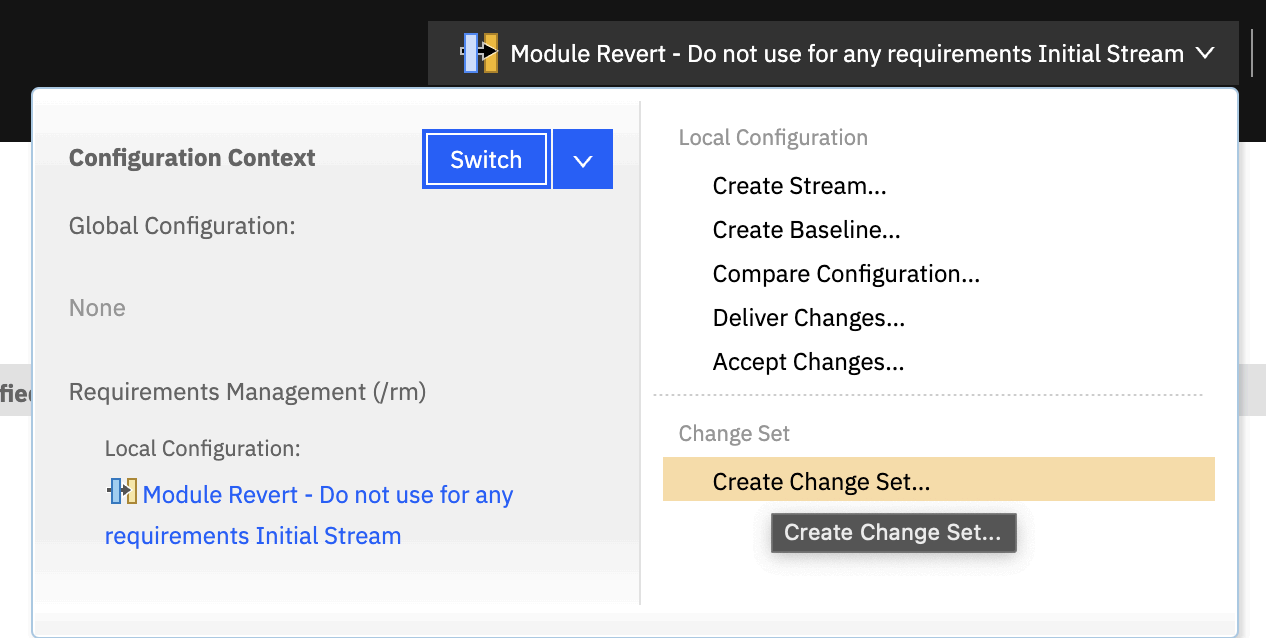
9.) How to create change set
4. Name the change set. But we will discard it at the end so the name is not important at all.
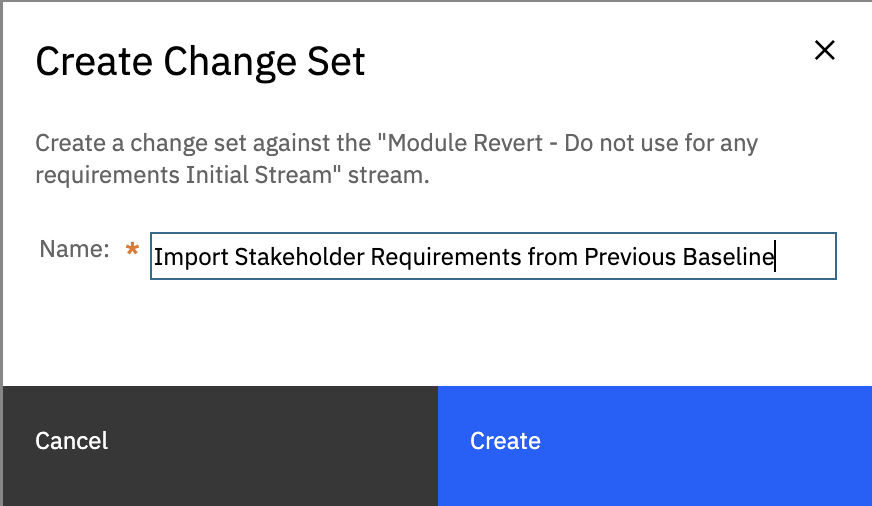
10.) Create Change set window
5. Close any Component Properties pop up screen again and make sure you are working in a change set now:

11.) Import SR window
Step 3: Load Component Properties from the Desired Baseline
The reason we created an empty component is because we want to reuse this component for all prospecting module rebase activities. The operation that we will use, namely “Clone from a component” is very sensitive to metadata and to be able to clone one artifact from one component to another, the metadata of the target and source components needs to be the same.
Therefore, in this step, we will equate the component properties (ie, the metadata) of the source and target components.
- While working in the change set, open “Manage Component Properties”

12.) Manage Component Properties options
which must be empty:

13.) Artifact types interface showcase
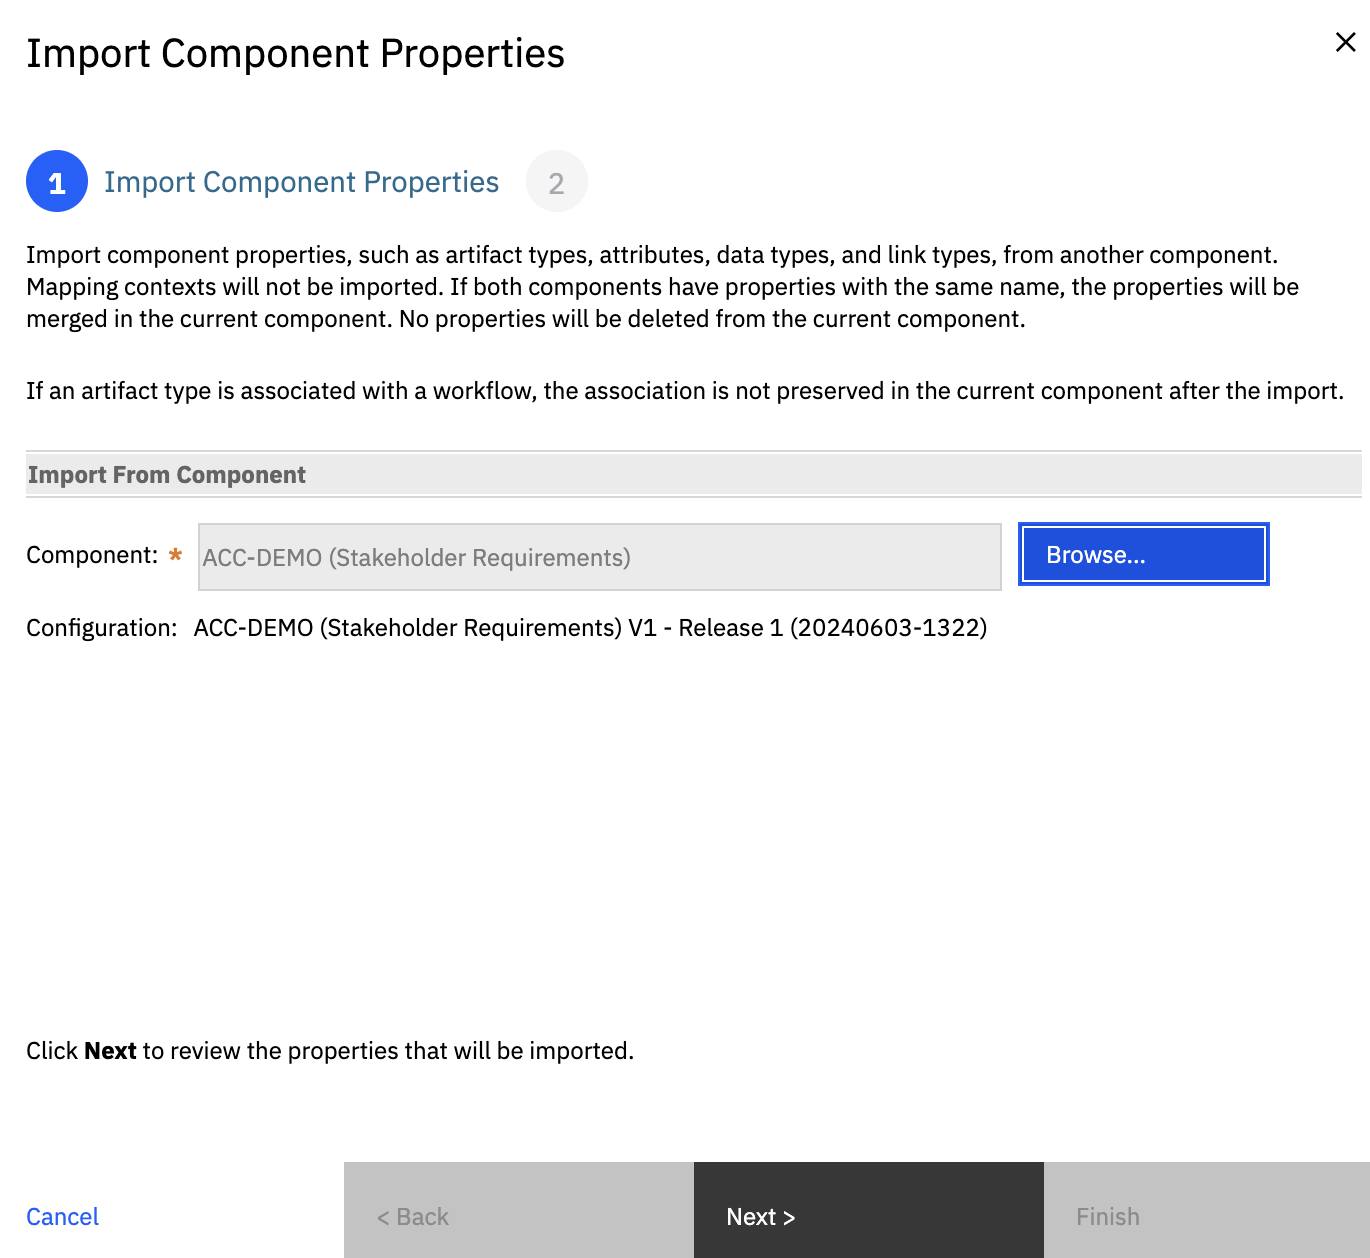
2. Click on “Import Component Properties”:

14.) Import properties button showcase
We are working in the temporary component which was empty, and we select the source component and its baseline that we want the selected module to revert to.
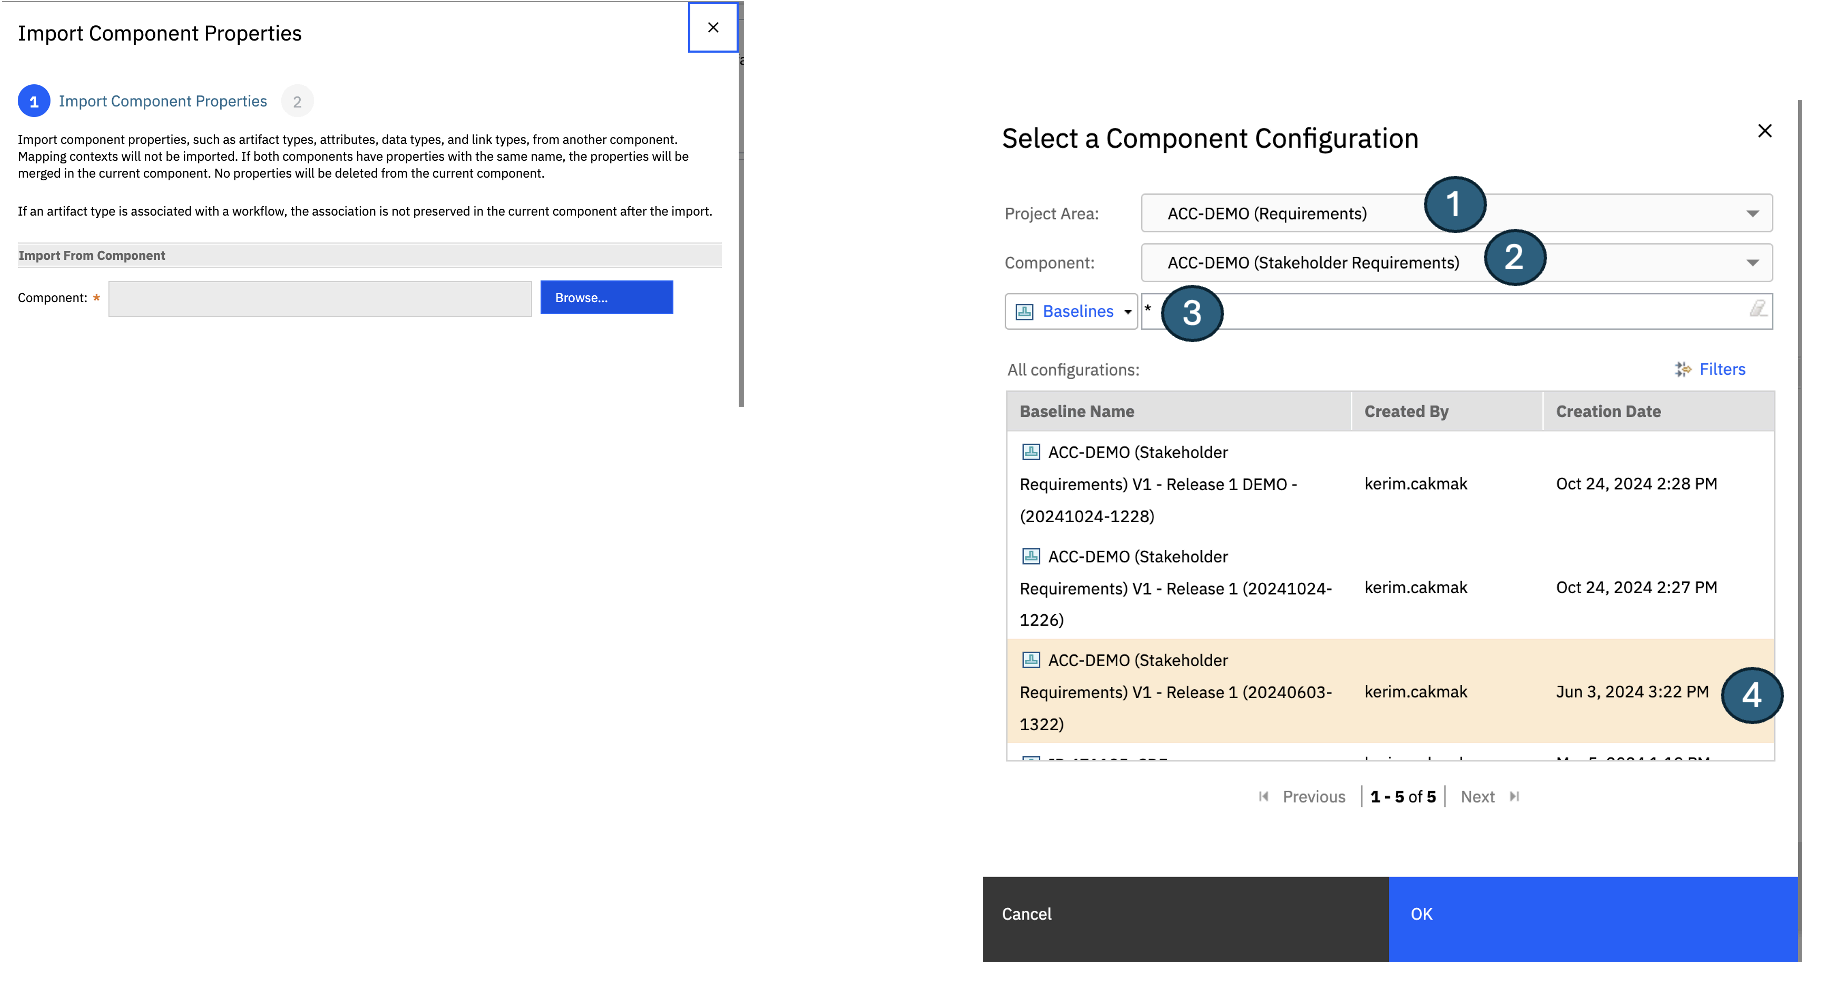
15.) Select component configuration window showcase
The import of the component properties will be very trivial because the target is already empty. So there is nothing that may cause any conflicts.
3. At the end of the wizard, make sure all the type system is loaded into the change set:
3.) Click "Add Widget" button
It is a good practice to keep these properties in the change set so that the main stream will not be affected and once we are done with the relocation of the module, we can discard the change set.
Step 4: Clone the module from the baseline to the change set in the new component.
After the component properties were aligned between the source and target (ie, between the baselined version as the source and the temporary component as the source) now we clone the desired module from the baselined version to our new component.
To do so, while working in the change set under the temporary component, right click on any folder and select “Clone from Component”:

17.) Artifact types window overview
To start cloning from the baselined version of the module to the temporary component, first select the source configuration:
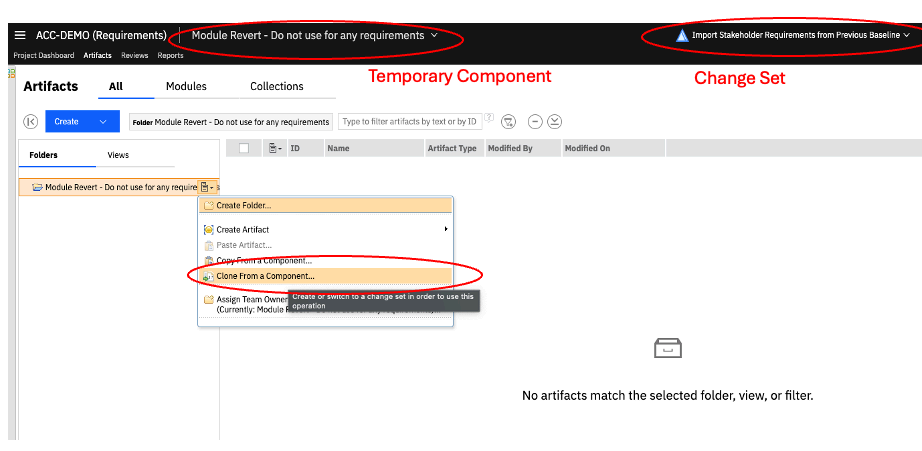
18.) Showcase of where the clone from component button is
Now we need to select which artifacts to clone from the baselined version to the temporary component:
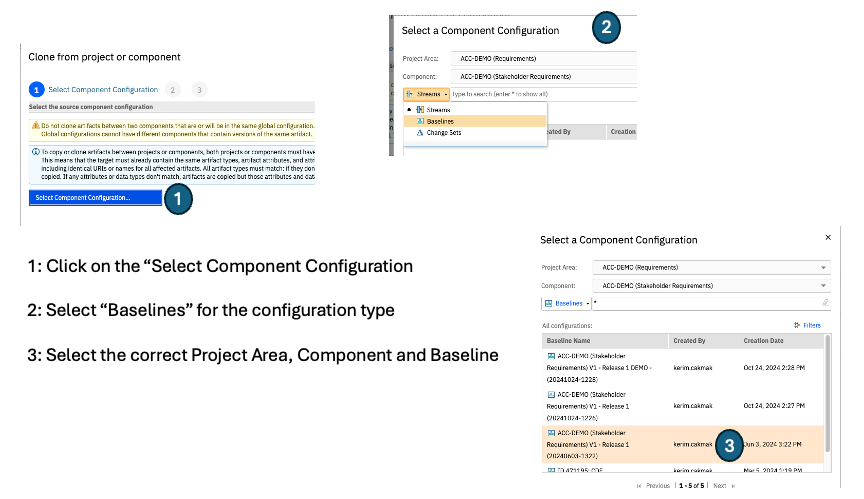
19.) Clone from component process showcase
Click “OK” then complete the “Clone from Component” wizard.
At the end, we will have the desired version of the module, cloned to the “Temporary Component” on a “Change Set” with all its artifacts exactly how they were in the desired baseline.
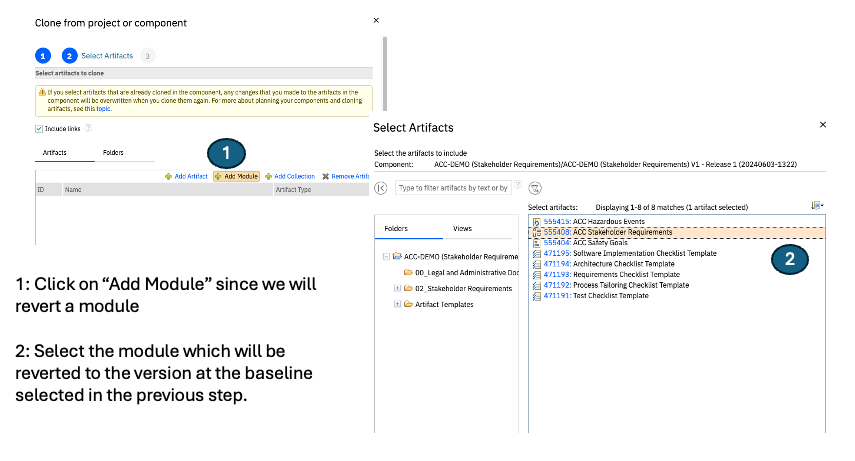
20.) Final steps of the process
Important Note: You do not have to Deliver the Change Set…
Step 5: Clone the Desired Version of the Module from Temporary Component back to the Working Stream
After this step we will overwrite the existing version of the module with the version from the selected baseline (from June 3)
- Create a change set on the original component and original stream:

22.) Create changeset button
- name it as “Revert of Stakeholder Requirements to Baseline 1”

- Use “Clone from Components” again but make sure you select the folder where the modules resides:
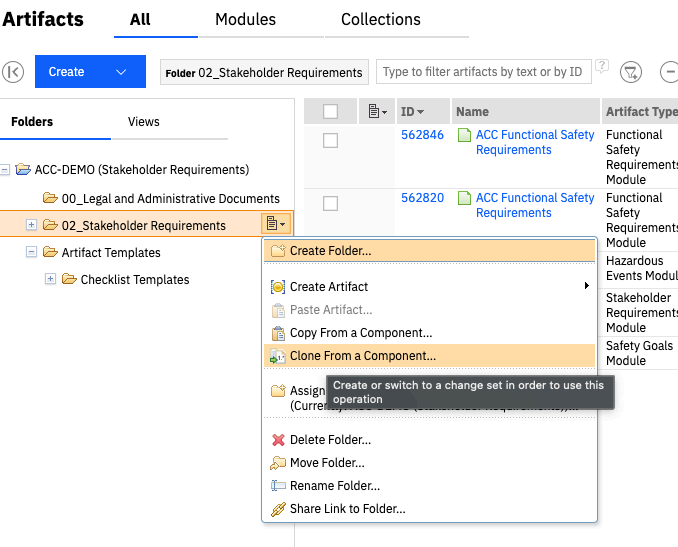
23.) Clone from a component button
- Select “Project Area”, “Component” as the temporary component, and make sure you select “Change Sets” instead of the Baselines this time as the configuration type as follows:
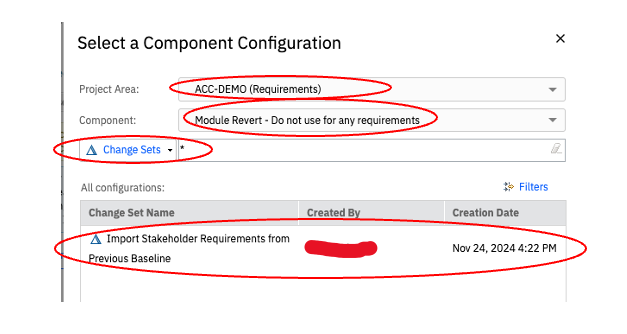
23.) Select component configuration window
- Select the module in the selected change set:
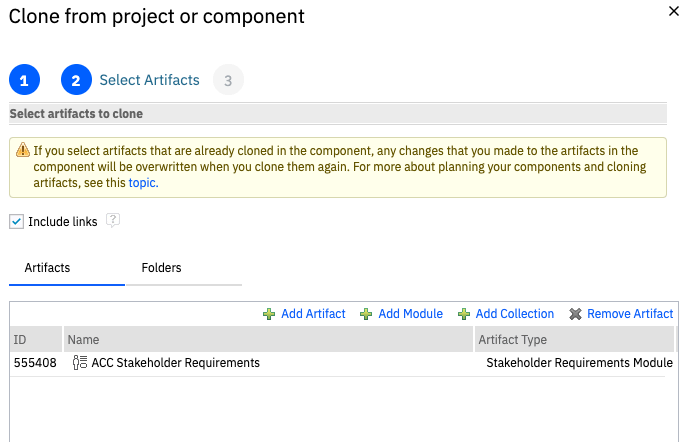
25.) Artifact selection window
At the end, all requirements and the module itself will be reverted back to the baselined version.
Ids and links will be kept.
Step 6: Close the Change Sets
Finally deliver the change set on the working, original component. But the change set on the temporary component can be discarded. So that the temporary component remains empty and will be ready to be reused for other similar prospecting activities
Case Study -2: A whole module or a partial section of a module needs to be reused in another variant stream
This technique can be applied to various cases. One other area of application is to propagate a certain set of requirements from one stream to another. In this case, assume we have documented system requirements for Variant 1 and then created another stream for Variant 2.
Meanwhile the team is working on the safety concept and is doing safety assessment on Variant 1. They documented functional safety requirement for Variant 1 but these should be reused in Variant 2 as well.
A deliver operation from Variant 1 to Variant 2 is a possible solution. However if you want to be very specific about what to send from one stream to another, Clone from Component can be used here as well. This situation can be depicted as follows:
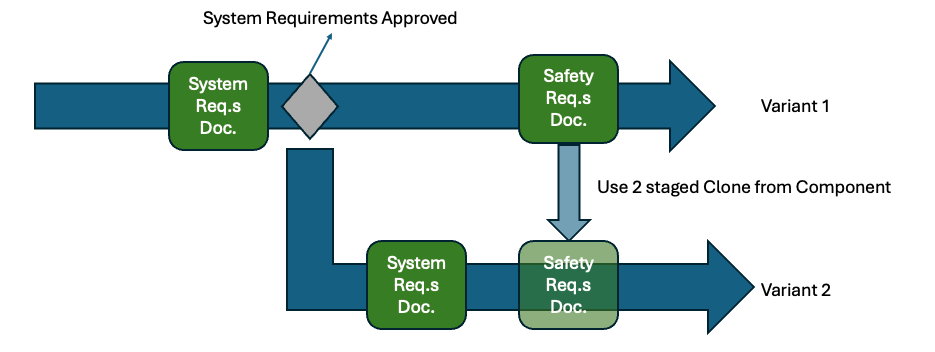
26.) Module Reuse Process
The safety requirements module was documented after the second stream was created. Thus, this document should be reused in the second stream as well.
In this case, the module can be cloned from Variant 1 to a temporary component and from the temporary component to Variant 2 stream.
Conclusion
The process described here can be depicted as follows:
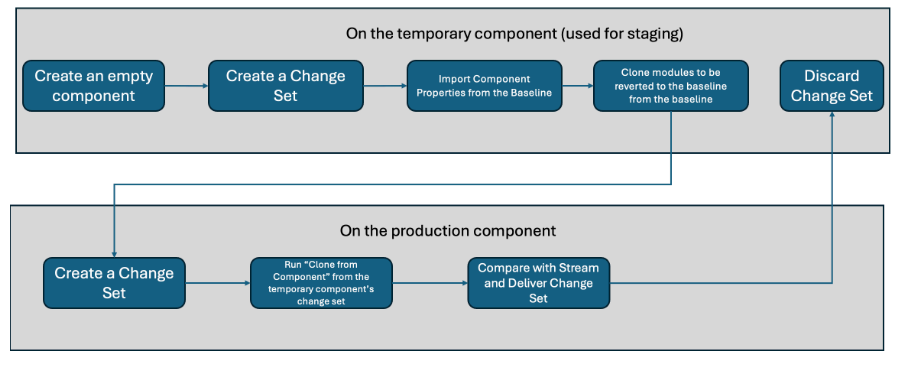
27.)Module Cloning process
Cloning from component is a handy feature especially to revert a module to a version from a former baseline, or the propagate requirements or modules from one configuration to another.
But it must be handled very carefully. Because if the cloning happens between two components which are likely to coexist in the same global configuration then there is a very good chance of a conflict which must be resolved and it would be very difficult to do so.
Thus we always recommend to use this feature only in the context of the same module ie, either clone a former version or clone between two streams of the same component.
In the case of cloning a module, say from stakeholder requirements component to system requirements component, would be very dangerous in terms of the consistency of the global configuration.
Softacus Services
We, in Softacus, are experts when it comes to consulting and service delivery of IBM software products and solutions in your business. We help our clients to improve visibility and transparency when licensing and managing commercial software, providing measurable value while increasing efficiency and accountability and we are providing services in different areas (see Softacus Services).
IBM ELM extensions developed by Softacus are free of charge for the customers who ordered IBM ELM licenses via Softacus or for the customers who ordered any of our services. If you are interested in any of our IBM ELM extensions, you found a bug or you have any enhancement request, please let us know at info@softacus.com.
Related and Referenced Topics
Blog Articles:
Basics of Links and Link Types in IBM DOORS Next Generation - learn the basics about the linking and link types in IBM DOORS Next.
Linking Techniques in IBM DOORS Next - article explaining basic concepts and showing multiple ways of creation of links between artifacts.
Link By Attribute Feature in IBM DOORS Next - the article explains how to use the "Link by attribute" function to automatically create, update, or delete one or more links between artifacts based on values in the attributes of the artifact.
Softacus Widgets:
Link Switcher - widget developed by Softacus, that converts the context of artifacts links in a very short time.
Module Link Statistics - extension that provides users with a quick overview of the amount of the links in specific link types in a module.
Link Type Change- extension developed by Softacus designed to enhance the functionality of DOORS Next Generation by allowing users to manipulate the direction of a link or convert it to another type of link.
Links Builder- extension that allows the users to create a link between two artifacts in DOORS Next Generation according to the certain rules.
Link by Foreign Attribute - this extension allows users to create links between artifacts in the selected module(s), based on the attributes values.
Show Attributes of Linked Artifacts - this extension shows the attributes and links of the artifact that is currently selected.
